How to create a video in the RealityCapture
Showcase of RealityCapture fancy features continues.
Next one on the list is a really great, a little bit hidden tool, called Screen Grabber. Screen grabber is a tool which allows you to record a video during workflow.
I believe that many of you have already created some video showing some sort of workflow. There are many tools which allows you to create such video, however, what is really great in this case, is that the tool is directly in the software, so you do need to look for any external applications.
Now, how is it hidden you ask ?
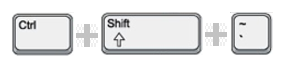
In order to run the screen grabber you need to use shortcut

Once you press the key you will hear the sound, which indicates that the recording has started. Make sure though that you have set up output folder for the video.
Then you just are just simply recording your work. Once you are finished you press the same keys again and recording stops.
What I strongly recommend is to try start/stop the video and listen to the sound. As it may happen that when you think that you are recording you actually just stopped the video. Talking from the personal experience.. :)
Moreover, do not worry if your reconstruction is taking longer time. You will not record 5 hour video. Screen grabber slows down recording during the computation, which means that every process will last 8 seconds at most.
Also, you do not need to sit behind the computer and wait until the computation is finished. After, the computation is done, screen grabber waits for mouse movement, it does not record anything until then. So just go and grab yourself some coffee. :)
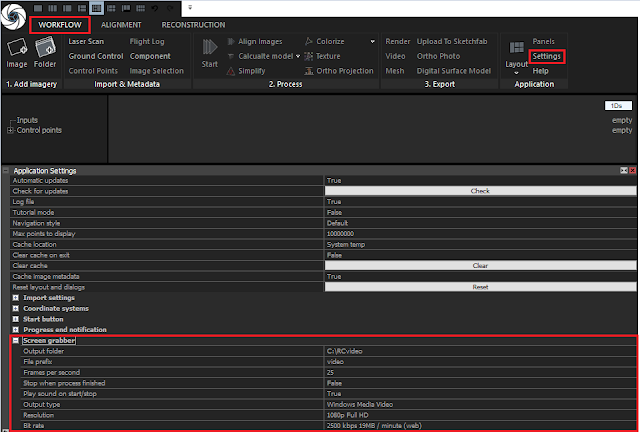
All the settings of screen grabber can be adjusted once you go to WORKFLOW tab / Settings.
If you want to start recording and following message pops-up, don't worry. It is there because you forgot to set up output folder in settings. Either you can write path directly to it (C:\videoXYZ) or click on the button next to it and select where you want the video to be saved. Easy!

Then, the screen grabber captures window area and stores to a disk with quality, resolution and frame-rate defined by you in the settings.
Useful tip: Selected window in RC has blue border. When you want to start recording, always have this window on 1D, 2D or 3D view. If the selected window shows Help the screen grabber will not start recording.
I have created for you this short video, where you can see where you can find help for screen grabber, where the settings are and how to adjust them.
And so you can see for yourself how it can be used I have created a video of reconstruction of my next model. I was thinking what would be my next model and then I thought..
Who doesn't like a good cannon? :)
So, here you can see the video of the whole process:
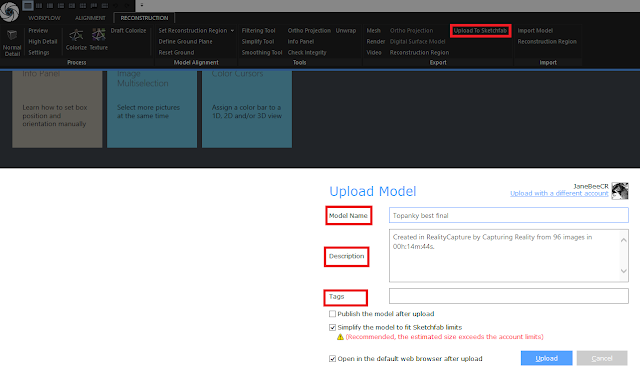
And here is the final model uploaded to Sketchfab:
Next one on the list is a really great, a little bit hidden tool, called Screen Grabber. Screen grabber is a tool which allows you to record a video during workflow.
I believe that many of you have already created some video showing some sort of workflow. There are many tools which allows you to create such video, however, what is really great in this case, is that the tool is directly in the software, so you do need to look for any external applications.
Now, how is it hidden you ask ?
In order to run the screen grabber you need to use shortcut
Once you press the key you will hear the sound, which indicates that the recording has started. Make sure though that you have set up output folder for the video.
Then you just are just simply recording your work. Once you are finished you press the same keys again and recording stops.
What I strongly recommend is to try start/stop the video and listen to the sound. As it may happen that when you think that you are recording you actually just stopped the video. Talking from the personal experience.. :)
Moreover, do not worry if your reconstruction is taking longer time. You will not record 5 hour video. Screen grabber slows down recording during the computation, which means that every process will last 8 seconds at most.
Also, you do not need to sit behind the computer and wait until the computation is finished. After, the computation is done, screen grabber waits for mouse movement, it does not record anything until then. So just go and grab yourself some coffee. :)
All the settings of screen grabber can be adjusted once you go to WORKFLOW tab / Settings.

If you want to start recording and following message pops-up, don't worry. It is there because you forgot to set up output folder in settings. Either you can write path directly to it (C:\videoXYZ) or click on the button next to it and select where you want the video to be saved. Easy!

Then, the screen grabber captures window area and stores to a disk with quality, resolution and frame-rate defined by you in the settings.
Useful tip: Selected window in RC has blue border. When you want to start recording, always have this window on 1D, 2D or 3D view. If the selected window shows Help the screen grabber will not start recording.
I have created for you this short video, where you can see where you can find help for screen grabber, where the settings are and how to adjust them.
And so you can see for yourself how it can be used I have created a video of reconstruction of my next model. I was thinking what would be my next model and then I thought..
Who doesn't like a good cannon? :)
And here is the final model uploaded to Sketchfab:


Comments
Post a Comment