How to never miss a spot again with inspection tool.
Let's get technical!
Because, I am very good in keeping my promises, we are going to focus on one very useful tool in RealityCapture software.
Imagine scenario:
You have decided that you are going to museum and that you have obtained permission to photograph one object, but you have to do it within one day. After that, you won't be allowed to photograph it ever again.
Now, it can go either very well, because you have read my previous post about taking photos and now your are Pros:)
Or, it can go really wrong, and you miss some spots of the photographed object and you discover it only after you are at your home or office, sipping your coffee, uploading photos and seeing huge hole in your 3D model.
Does the coffee have taste of regret? I bet it does.
However, luckily, with RC you can avoid this horrific scenario.
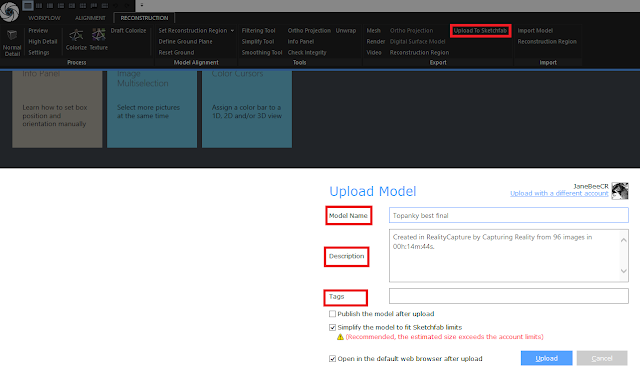
The solution to this problem is Inspection tool. I have already mentioned this tool in my previous post, but now I want to give you more details, so you really understand how it works.
Inspection is very powerful when verifying where to add images and what are good and weak points of a scene. It might help you to find more optimal configuration for your cameras and so on. In other words, use this tool to analyse dependencies among cameras in a scene.
- That is the basic definition.
But how it actually works, you ask?
I went outside to take photos of another pair of my lovely shoes, but this time I was ready and had my laptop with me. Once I thought that I have enough pictures, I have uploaded them to RC to see how it looks.

First of all, I have aligned the pictures and then I used the inspection tool to see whether there are any weak spots.
Altogether 80 images, 6000 x 4000 px, were aligned literally in a minute.
Once you press Inspect, first thing you see is a web of blue lines. The denser the web is, the better.

As you can see for yourselves. The web is quite dense, but there is a hole from one side. There is couple of cameras visible in the picture, but for some reason they are not connected to the rest. It might be because i have jumped too far.
Or maybe there was a squirrel somewhere and I just got distracted and forgot what I was doing.
Reminder to myself: Stay focused on what you are doing.
So to continue, thanks to the inspection tool I was able to see, that I need to take more photos of that part.
Thus, I gave it another try and did one more circle in order to fill the empty parts. I went just a little bit overboard as I did more photos than with the first attempt. But I wanted to be sure that I have really covered everything this time.
Then, I just added new pictures to the existing project and ran alignment again. This time the alignment took about 4 minutes, so do not worry, you will not stand outside for an hour, waiting for the results.
And as you can see the hole is almost gone.

From what you can see on the pictures, I should have done one more circle in the middle, that way I would have covered the whole object.
Basic rule is, that one feature should be visible at least on 3 cameras. That way you can be sure that you have covered, the whole object.
Remember, you might think that you have covered the whole object, because you have seen the whole object, but, in many cases it is not true.
Human eyes LIE!
But that is why the inspection tool exists. To help you discover the true and avoid the horrific scenario mentioned before.
So, my advice is, that you if are going to take photos of object that might not be there again, or you won't be able to visit some place again, basically, when there is no way back, always have your laptop ready. Because that way you can upload your photos directly to RC and are able to see what have you missed and just shoot more photos, right there, on the spot.
Furthermore, if you do not have license for RC on your laptop, you can use just the demo version of the software, as it is possible to use inspection tool there as well, and it is completely free.
And finally, here is the result.
Because, I am very good in keeping my promises, we are going to focus on one very useful tool in RealityCapture software.
Imagine scenario:
You have decided that you are going to museum and that you have obtained permission to photograph one object, but you have to do it within one day. After that, you won't be allowed to photograph it ever again.
Now, it can go either very well, because you have read my previous post about taking photos and now your are Pros:)
Or, it can go really wrong, and you miss some spots of the photographed object and you discover it only after you are at your home or office, sipping your coffee, uploading photos and seeing huge hole in your 3D model.
Does the coffee have taste of regret? I bet it does.
However, luckily, with RC you can avoid this horrific scenario.
The solution to this problem is Inspection tool. I have already mentioned this tool in my previous post, but now I want to give you more details, so you really understand how it works.
Inspection is very powerful when verifying where to add images and what are good and weak points of a scene. It might help you to find more optimal configuration for your cameras and so on. In other words, use this tool to analyse dependencies among cameras in a scene.
- That is the basic definition.
But how it actually works, you ask?
I went outside to take photos of another pair of my lovely shoes, but this time I was ready and had my laptop with me. Once I thought that I have enough pictures, I have uploaded them to RC to see how it looks.

First of all, I have aligned the pictures and then I used the inspection tool to see whether there are any weak spots.
Altogether 80 images, 6000 x 4000 px, were aligned literally in a minute.
Once you press Inspect, first thing you see is a web of blue lines. The denser the web is, the better.

Reminder to myself: Stay focused on what you are doing.
So to continue, thanks to the inspection tool I was able to see, that I need to take more photos of that part.
Then, I just added new pictures to the existing project and ran alignment again. This time the alignment took about 4 minutes, so do not worry, you will not stand outside for an hour, waiting for the results.
And as you can see the hole is almost gone.

From what you can see on the pictures, I should have done one more circle in the middle, that way I would have covered the whole object.
Basic rule is, that one feature should be visible at least on 3 cameras. That way you can be sure that you have covered, the whole object.
Remember, you might think that you have covered the whole object, because you have seen the whole object, but, in many cases it is not true.
Human eyes LIE!
But that is why the inspection tool exists. To help you discover the true and avoid the horrific scenario mentioned before.
So, my advice is, that you if are going to take photos of object that might not be there again, or you won't be able to visit some place again, basically, when there is no way back, always have your laptop ready. Because that way you can upload your photos directly to RC and are able to see what have you missed and just shoot more photos, right there, on the spot.
Furthermore, if you do not have license for RC on your laptop, you can use just the demo version of the software, as it is possible to use inspection tool there as well, and it is completely free.
Interesting and amazing how your post is! It Is Useful and helpful for me That I like it very much. and I am looking forward to Hearing from your next.. Rig Mast Inspection
ReplyDeleteThanks for sharing this information. I really like your blog post very much. You have really shared a informative and interesting blog post with people.. Rig Mast Inspection
ReplyDeleteThanks for the information. Question, I'll give it a try but wanted to ask. If I'm planing to take a capture using static 360 cameras, meaning I'll not be walking around taking pictures. What is the best suggested position of these? Imagine I'm having 3 heights of cameras, 6 each level all around, separated with < 30 degree of separation.
ReplyDeletea) Same vertical position for L1, L2 and L3 --> Placed on a vertical line.
b) Same vertical position for L1 and L3 but level L2 in moved to one side, creating a triangle
c) All cameras in different vertical position. L1, then L2 moved on one side of L1 (right), then L3 moved on one side one side of L2 (right) --> staggered.
Thank you!