How to scan shiny surfaces
Windows, glasses, jewelry, metallic surfaces.. everything transparent, reflective or shiny... the eternal enemy of photogrammetry. Luckily, there are heroes which can fight these villains. They might be inconspicuous, blended within the crowd. However, they are always there to help in times of need.
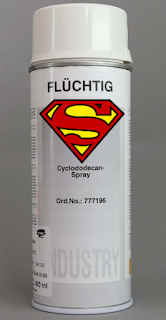
These heroes are called....wait for it... coating sprays!
For those who are new to photogrammetry and are wondering why is it such a nightmare to scan transparent, reflective or shiny surfaces, the explanation is quite easy. Photogrammetry works based on exact positions of reference points on certain surface. Thus, with these types of objects, the surface has no texture/detail which software can pick up on and the reflection is changing as you move, hence the reference points cannot be defined.
Imagine a glass... you don't only see reflection of yourself and the surrounding environment, but you see through the glass and see the distorted version of what is behind the glass. But that is not the real surface of the object. This is when all photogrammetry software get confused, because they just simply assume that all the objects are non-reflective and matte.
Even in full-body scanning, where the camera rigs take more than 150 pictures simultaneously, it is recommended that if the person is normally wearing glasses to take them off and create 3D model without them and then add them to the person's face in later processing.
Coating sprays are really helpful, however sometimes they might not be a solution. Especially when it comes to some historical or valuable objects. The owner of the object may not be 100% comfortable with the fact that you are going to spray it with some blamable chemical. Indeed, the spray comes off, either it dissolves by itself or you just wash it and it is gone. However, if the object has lot of details and folds, the spray might get there and it can be hard to get rid of it.

So, let's continue with this experiment.
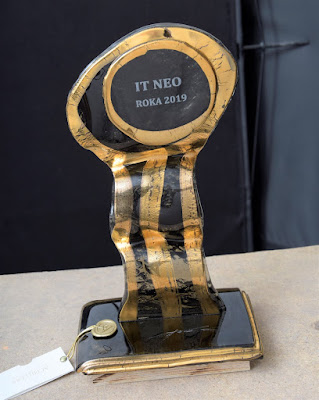
I have chosen for this experiment this beautiful, shiny prize.
Not that I'd have won it..
You can just simply buy it..
How goes the saying?
If you can't win it, buy it?
Now you have experienced my sporting spirit :) oh well..
You can see for yourself that this little bad boy is shiny as the Sun itself. So how do we do this?
First of all, do not try this at home! Seriously! It is flammable, so this way if anything bad happens, you won't burn down your house but only your garden.
Applying the coat with the spray is actually pretty easy. So do not worry if you have not done this before. I did not look up any information about the best techniques. Indeed, there must be a better way how to do it. For example, to avoid the coat being very thick. Anyway, for the first attempt the results are pretty good.
And for the purpose of this experiment it was sufficient. Great thing about using this particular spray was that it dissolved overnight.
Here you can see before and after. As you can see it turn out pretty well. Basically, in this case, what you get is the prize looking exactly how it looked right before they dipped it in 24 karat gold. I'm pretty sure they did that...

IMPORTANT: Before you start coating the object with the spray, take photos of the object as it is. Nice and shiny. Just do it the same way as if you want to create 3D model directly from that set of photos. You can later use it for texture.
When you have the first set of photos, then you cover the object with spray and take another set of photos. Another very IMPORTANT thing is that you do not move the object at all while spraying. Even the smallest movement can make it impossible to align the sprayed and original images together.
Now, let's focus on reconstruction.
Here is the whole process step by step:


6.In "Selected inputs" set "Enable meshing" to FALSE -> RC will use just the sprayed images for meshing


10. Select only 4-images that show the object from all sides -> set "Enable texturing and coloring" to TRUE

These heroes are called....wait for it... coating sprays!

Imagine a glass... you don't only see reflection of yourself and the surrounding environment, but you see through the glass and see the distorted version of what is behind the glass. But that is not the real surface of the object. This is when all photogrammetry software get confused, because they just simply assume that all the objects are non-reflective and matte.
Even in full-body scanning, where the camera rigs take more than 150 pictures simultaneously, it is recommended that if the person is normally wearing glasses to take them off and create 3D model without them and then add them to the person's face in later processing.
Coating sprays are really helpful, however sometimes they might not be a solution. Especially when it comes to some historical or valuable objects. The owner of the object may not be 100% comfortable with the fact that you are going to spray it with some blamable chemical. Indeed, the spray comes off, either it dissolves by itself or you just wash it and it is gone. However, if the object has lot of details and folds, the spray might get there and it can be hard to get rid of it.

So, let's continue with this experiment.
I have chosen for this experiment this beautiful, shiny prize.
Not that I'd have won it..
You can just simply buy it..
How goes the saying?
If you can't win it, buy it?
Now you have experienced my sporting spirit :) oh well..
You can see for yourself that this little bad boy is shiny as the Sun itself. So how do we do this?
First of all, do not try this at home! Seriously! It is flammable, so this way if anything bad happens, you won't burn down your house but only your garden.
Applying the coat with the spray is actually pretty easy. So do not worry if you have not done this before. I did not look up any information about the best techniques. Indeed, there must be a better way how to do it. For example, to avoid the coat being very thick. Anyway, for the first attempt the results are pretty good.
And for the purpose of this experiment it was sufficient. Great thing about using this particular spray was that it dissolved overnight.
Here you can see before and after. As you can see it turn out pretty well. Basically, in this case, what you get is the prize looking exactly how it looked right before they dipped it in 24 karat gold. I'm pretty sure they did that...

IMPORTANT: Before you start coating the object with the spray, take photos of the object as it is. Nice and shiny. Just do it the same way as if you want to create 3D model directly from that set of photos. You can later use it for texture.
When you have the first set of photos, then you cover the object with spray and take another set of photos. Another very IMPORTANT thing is that you do not move the object at all while spraying. Even the smallest movement can make it impossible to align the sprayed and original images together.
Now, let's focus on reconstruction.
Here is the whole process step by step:
1. Add original (shiny) images to RC

2. Export image list to shiny.imagelist file

3. Add sprayed images to RC
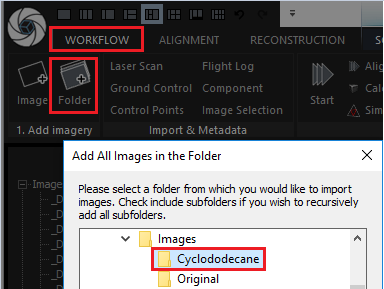
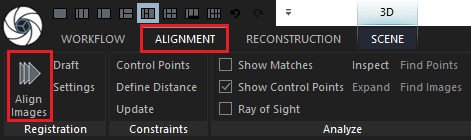
4. Align all together
5. Import shiny.imagelist as selection

6.In "Selected inputs" set "Enable meshing" to FALSE -> RC will use just the sprayed images for meshing

8. Simplify

9. Multiselect all images and set "Enable texturing and coloring" to FALSE


10. Select only 4-images that show the object from all sides -> set "Enable texturing and coloring" to TRUE

11. Run texturing -> only those 4 images will be used for texture
For better understanding I have created a short video, so you can see exactly how it is done.
And here is the model on Sketchfab

Thanks for great tutorials, why not use more then 4 images?
ReplyDeleteFantastic tutorial! Thank you!
ReplyDeleteRD-Textures offers the best photogrammetry textures you need for the various CG projects.
ReplyDeleteThanks for adding the software screenshots. That is very helpful.
ReplyDelete